Es muy normal encontrarse con estos “bichos” en viveros, colecciones, invernaderos, etc.
Es muy frustrante ver como una planta que estaba en perfectas condiciones y muy linda, de pronto se pone fea, o se muere directamente.
En muchas ocasiones son visibles y se puede tomar medidas inmediatamente, pero en otras, y esto es lo peor, no se los ve a simple vista o las cochinillas se encuentras en las raíces y cuando me doy cuenta ya es tarde….
It is very normal to find these "bugs" in nurseries, libraries, greenhouses.
It is very frustrating to see a plant that was in perfect condition and very cute, suddenly turns ugly, or dies directly.
In many instances are visible and can take action immediately, but in others, and this is the worst, are not seen with the naked eye or bugs are found in the roots and when I realize it's too late ....
La principal dificultad a la hora de combatir las cochinillas es la resistencia del caparazón en absorber los insecticidas. Por este motivo, es más efectivo concentrarse en el control de las larvas que en los insectos adultos.
The main difficulty in combating the mealybugs is the resistance of shell to absorb insecticides. For this reason, it is more effective to focus on larval control in adult insects.
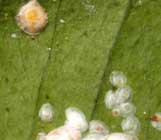
Hay diversas especies de insectos que se llaman en general, Cochinillas, Cócidos, Caspillas, Conchuelas, Chanchitos, etc..
Todas las Cochinillas se caracterizan por tener una especie de escudo protector, de distintos colores y consistencias, según la especie de que se trate.
Es la plaga más frecuente en jardinería junto a los Pulgones y puede afectar a casi cualquier planta.
Se alimentan clavando un pico chupador sobre hojas, tallos y frutos y chupan la savia. Parte de esta savia la excretan como líquido azucarado (melaza). Hay algunas especies de cochinillas que no lo hacen; son los Diaspinos. Pueden tener 1 o más generaciones en el año, según la especie y el clima de la zona. Es decir, que salen de un huevo como larva, se transforma en la cochinilla adulta y éstas ponen huevos de los cuales vuelven a eclosionar larvas y este proceso (generación) se repite 1, 2 ,3... veces al año.
There are several species of insects that are called in general, Mealybugs, boiled, Caspillas, Scallops, Pigs, etc. .. All Mealybugs are characterized by a kind of shield, of various colors and consistencies, depending on the species concerned. It is the most common pest in gardens next to the aphids and can affect almost any plant They feed by inserting a peak sucking on leaves, stems and fruit and suck sap. Part of this sap and excrete a sugary liquid (molasses). Some species of scale insects do not; are Diaspinos. May have 1 or more generations in the year, depending on the species and climate of the area. That is, emerging from an egg as a larva becomes an adult cochineal and they lay eggs from which larvae hatch again and the process (generation) is repeated 1, 2, 3 ... times a year.
Hay muchas especies de cochinillas
I. Diaspinos (no segregan melaza) -
Piojo rojo (Chrysomphalus dictyospermi) -
Piojo rojo de California (Aonidiella aurantii) -
Piojo blanco (Aspidiotus nerii) - Piojo gris (Parlatoria perganderi) -
Serpeta fina (Lepidosaphes gloverii) -
Serpeta gruesa (Lepidosaphes beckii) -
Piojo de San José (Quadraspidiotus perniciosus): ataca a frutales.
II. Lecaninos -
- Caparreta negra o Cochinilla de la tizne o Cochinilla del olivo (Saissetia oleae). Hace más daño la Negrilla que ella. -
- Caparreta blanca (Ceroplastes sinensis). Sin importancia económica. -
- Cochinilla de los agrios (Coccus hesperidium). No precisa tratamiento alguno, ya que es controlada totalmente por la lucha biológica.
III. Cochinillas con protección algodonosa
- Cotonet o Cochinilla algodonosa (Planococcus citri)
- Cochinilla acanalada (Icerya purchasi)
Many species of scale insects.
I. Diaspinos (not secrete honeydew) - Red scale (Chrysomphalus dictyospermi) - California Red scale (Aonidiella aurantii) - White Lice (Aspidiotus nerii) - Louse Gray (Parlatoria perganderi) - Serpeta fine (Lepidosaphes gloverii) - Serpeta thick (Lepidosaphes beckii) - San José (Quadraspidiotus perniciosus) attacks fruit trees.
0II. Lecaninos - Caparreta black or soot or Cochineal Cochineal the olive (Saissetia oleae). The Bold does more harm than her. - white Caparreta (Ceroplastes sinensis). No economic importance. - the citrus mealybug (Coccus hesperidium). It does not require any treatment, since it is controlled entirely by biological control.
III. Cottony scale insects protected - cotonet or mealy bugs (Planococcus citri) - Cochineal corrugated (Icerya purchasi)
Daños:
Producen 2 tipos de daños:
Daños directos al absorber savia. Pierde vigor, la planta se debilita al absorber al chupar los jugos por medio de un pico que clavan en hojas, ramas o frutos.
Daños indirectos por el hongo Negrilla que se asienta sobre la melaza que excretan.
Esto también debilita puesto que ennegrece las hojas impidiendo la fotosíntesis. El deterioro estético es importante.
Damage:
Produce 2 types of damage: - Direct damage by sucking sap. Loses force weakens the plant by sucking the juices soak through a peak dig into leaves, branches or fruit. - Indirect damage by the fungus Bold that sits on the honeydew excreted. This also weakens as it blackens the leaves preventing photosynthesis. The deterioration of the appearance is important.
Control
Eliminar las partes muy afectadas.
Da buenos resultados colocar las plantas atacadas (si están en maceta o cualquier otro contenedor movible) en un sitio más fresco y con mayor luz.
A esta plaga le favorece el ambiente seco y cálido.
Son insectos difíciles de combatir porque tienen caparazones que les protege de los insecticidas.
En plantas de interior se les puede pasar por encima un algodón o un cepillo mojado en alcohol metílico.
Para eliminarlas no hay que desesperar; con los tratamientos adecuados se controla, aunque es dura.
Los tratamientos con productos químicos, para que sean mucho más eficaces, deben ir dirigidos contra las larvas, que son más sensibles que el adulto.
Como norma general, se pueden hacer 2 aplicaciones preventivas: es muy importante tratar cuando haya el mayor número de larvas, ya que de ello depende la eficacia del tratamiento.
Una vez detectadas las cochinillas, se debe efectúar 2 ó 3 tratamientos con un intervalo de 15-20 días con insecticidas anticochinillas.
Es importante controlar las posibles reinfestaciones, puesto que el control absoluto de las Cochinillas es muy difícil.
Control
• Remove the parties most affected. • Gives good results placing the plants attacked (if in pot or other container insert) in a cooler and more light. This pest favors you dry and warm. • They are difficult to control insects because they have shells that protects them from insecticides. Indoor plants they can pass over a cotton or a brush dipped in methylated spirit. To remove them we must not despair, with appropriate treatment is monitored, although it is hard. • Treatment with chemicals, to be much more effective, must be directed against the larvae, which are more sensitive than adults. • As a general rule, you can make 2 applications preventive: it is very important to treat when the greatest number of larvae, as this will determine the effectiveness of treatment. • Once detected the scales, must be made 2 or 3 treatments with an interval of 15-20 days with insecticides anticochinillas. • It is important to monitor the possible re-infestations, since the absolute control of the insect is very difficult.
REMEDIOS ECOLÓGICOS
Aplicar una solución de jabón y alcohol con una esponja. Se disuelve una chucharada de jabón o un chorro de lavavajillas en un poco de agua no muy caliente. Añadir un litro de agua y una cucharada de alcohol de quemar. Con un pincel, se unta los insectos o rocía toda la planta sin olvidar el revés de las hojas. Las plantas de hojas delicadas se aclararán con agua tibia al cabo de 15 minutos, para que no se quemen.
Las Cochinillas tienen numerosos depredadores naturales en el jardín. Mariquitas y numerosos endoparásitos. Por ejemplo, el Cotonet o Cochinilla algodonosa (Planococcus citri) es difícil de combatir con productos pero tiene un magnífico depredador llamado: Cryptolaemus montrouzieri. En algunos citricos, no suele tratarse con insecticidas gracias a él

La Cochinilla acanalada (Icerya purchasi) también es muy bien controlada en el jardín por el insecto Rodolia cardinalis, un escarabajo que come cochinillas. De hecho, es mejor no tratar con productos químicos para no afectar a Rodolia.
Uno de los fundamentos de la lucha contra las plagas sin usar productos químicos es favorecer a los insectos auxiliares, esos que son beneficiosos porque comen o parasitan a las propias plagas. Los dos ejemplos son magníficos aliados del jardinero y del agricultor.
ORGANIC REMEDIES • Apply soap and alcohol solution with a sponge. Chucharada breaks up soap or dishwasher running in a little hot water. Add a quart of water and a tablespoon of methylated spirits. With a brush, or spray insect smeared across the floor without forgetting the underside of the leaves. The delicate-leaved plants are rinsed with warm water after 15 minutes to prevent burning. • The Mealybugs have many natural predators in the garden. Ladybugs and numerous endoparasites. For example, the swab or mealy bugs (Planococcus citri) is difficult to combat but has a wonderful product called predator: Cryptolaemus montrouzieri. In some citrus, usually not treated with insecticides because of it. Corrugated Mealybug (Icerya purchasi) is also very well controlled in the garden by the insect Rodolia cardinalis, a beetle that eats mealybugs. In fact, it is better not to deal with chemicals affect not Rodolia. • A cornerstone of the fight against pests without using chemicals is to benefit auxiliary insects, those that are beneficial because they eat or parasitize pests themselves. The two examples that I have made are great allies of the gardener and farmer.
CACTUS Y OTRAS CRASAS
Cochinillas (Saissetia spp., Chionaspis spp., etc.) Las Cochinillas son bastante frecuentes en plantas Crasas y Cactus.
Distinguimos las que atacan la parte aérea y las que atacan a las raíces.
- Las Cochinillas algodonosas (Pseudococcus spp.) producen una secreción semejante al algodón que las protege.
Para prevenir las Cochinillas, un tratamiento en primavera y otro en otoño. Una vez detectada la plaga se deberían hacer dos pulverizaciones con un intervalo de 15 días con insecticida antes mencionado
- Cochinillas algodonosas de raíz (Rhizoecus spp.) Para detectar Cochinillas que parasitan las raíces es necesario sacar la planta de la maceta para inspeccionar el cepellón y descubrir un algodoncillo blanco.
Exteriormente se manifiesta en que la planta no crece. Si alguna planta ves que no ha crecido al terminar la primavera, comprueba si en las raíces tiene cochinillas. El control consiste en sumergir la maceta durante 20 ó 30 minutos en una mezcla de agua con insecticidas que contengan alguna de estas materias activas: acefato, clorpirifos, diazinon, fenitrotion, metidatión, metil-pirimifos y oxamilo.
CACTUS AND OTHER FAT • Mealybugs (Saissetia spp. Chionaspis spp., etc.) Mealybugs are fairly common in succulents and cactus. Distinguish those that attack the air and attacking the roots. Mealy bugs (Pseudococcus spp.) produce a cotton-like secretion that protects them. To prevent Mealybugs, a treatment in the spring and fall. Once detected the pest two sprays should be made with an interval of 15 days with above-mentioned insecticide • Root mealy bugs (Rhizoecus spp.) Scale insects to detect parasites of roots is necessary to remove the plant from the pot to inspect the root ball and find a white milkweed. Outwardly manifested in the plant does not grow. If you see a plant that has not grown at the end of the spring, check if you have root mealybugs. The control is to immerse the pot for 20 or 30 minutes in water mixed with insecticides that contain any of these active substances acephate, chlorpyrifos, diazinon, fenitrothion, methidathion, methyl-pirimiphos and oxamyl.
Si te parecio interesante y tenes algun otro remedio casero, natural o ecologico por favor compartilo aquí. Muchas gracias
If you found interesting and you got some other home remedies, natural or ecological please Share here. Thank you very much
(fotografías tomadas de la web)